How to Install a Metal Roof Boot
Metal roof boots are essential for any roofing system, playing a key role in preventing water penetration and protecting from water damage. Installing roof boots around plumping pipes, furnace vents, and chimneys can be a simple and easy fix that produces long-lasting protection. Check out our blog for a step-by-step explanation on how to install a roof boot to your metal roof.
Jump to the Information You Need:
What is a Roof Boot?

A roof boot, also known as a pipe boot, pipe flashing, or roof flashing, is a weatherproofing device typically made from a flexible aluminum base and rubberized material. The devices are designed to fit around pipe penetrations such as vent pipes, exhaust fans, skylights, and chimneys, providing a waterproof seal that prevents water from seeping into your structure. Roof boots ultimately redirect water away from vulnerable areas of your roof and safeguard against leaks, mold, mildew, and other structural damage.
The malleable aluminum base allows for additional flexibility, conforming to the shape and pitch angle of your metal roof. Additionally, the rubber boot material can be cut and adjusted to the diameter of the pipe, fitting tightly around the tube. Most roof boots contain multiple layers, or "ribs," of rubber rings, decreasing in diameter size the taller the boot gets. This provides a range of diameter sizes for you to work with, cutting the rubber layers until you reach the right length for your pipe.
Installing a roof boot correctly around the pipe means the risk of water leakage diminishes substantially. When a boot is not installed properly, water can get into the opening and damage the roof, beams and joists, as well as leak into walls and ceilings. Following best practices for roof boot installation prevents this damage from happening. And it starts with choosing the right-sized boot.
How to Choose a Roof Boot
There are so many options to choose from when picking out the right roof boot. Keep in mind a few different considerations to help you make your decision:
-
Diameter Size: You should always choose a roof boot with the correct size opening for the pipe. Boots with too small openings will cause strain on the rubber collar of the boot, resulting in fatigue failure. Too big of openings allows more opportunities for water damage to occur.
-
Material Selection: Roof boots are made from different types of rubber and metals to accommodate varying climates. Choose a roof boot that can withstand water, corrosion, UV rays, and the expansions and contractions of roofs during seasonal temperature changes.
-
Exhaust Temperatures: In regards to material, consider the exhaust or ventilation temperatures that are likely with your vent, chimney, and other roof penetrations. Make sure to use high temperature roof boots in instances where exhaust temperatures reach up to 500°F.
-
Roof Pitch: The pitch of your roof can affect the effectiveness of flashing. Steeper roofs may require additional measures to ensure proper water runoff.
- Local Building Codes: Lastly, check local building codes and regulations to ensure compliance with flashing installation requirements. Some areas may have specific guidelines that dictate the type and placement of flashing.
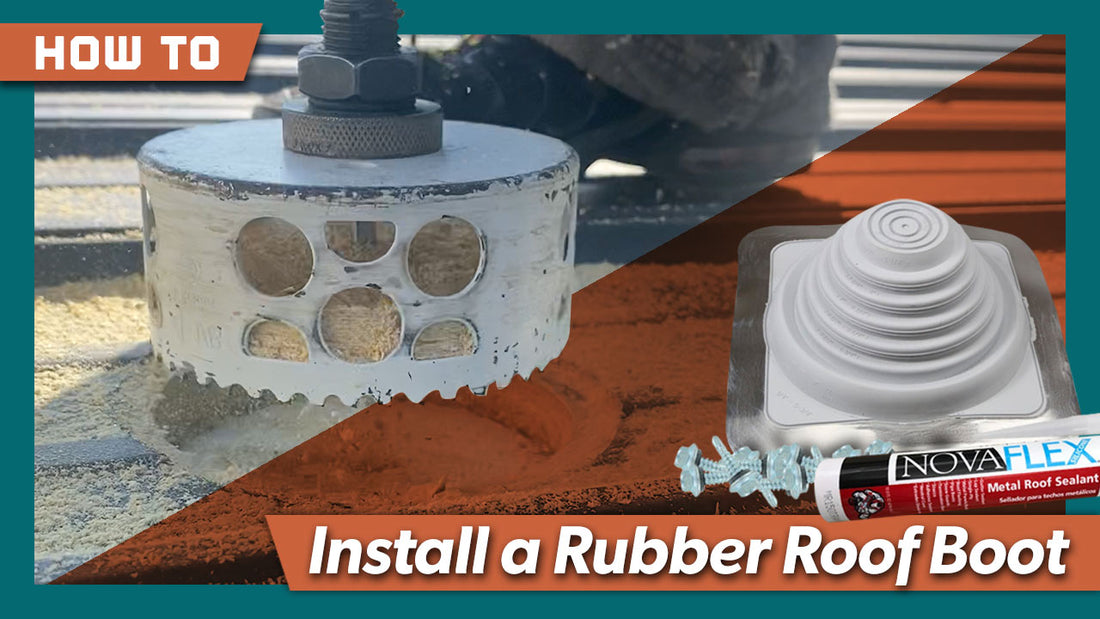
Roof Boots from Fasteners Plus
We offer high-quality Master Flash roof boots from Aztec Washer, available in a variety of sizes and shapes. Each boot is made with a flexible aluminum base that conforms to any metal roofing panels. Fasteners Plus provides two types of metal roof boots:
-
EPDM Roof Boots: A gold standard, these seal up roof penetrations and protect against water, ozone, and UV rays. EPDM boots withstand temperatures up to 212°F and hold for continuous use when installed properly. These boots are available in regular options, as well as Extreme Angle Roof Boots and Retrofit Pipe Boots.
- High Temp Pipe Flashings: Designed to withstand extreme temperatures, High Temp Pipe Boots maintains against temperatures rated up to 500°F. These work perfectly for stove pipes, chimney boots, and other vents with constantly-high temperatures.
Fasteners Plus also carries Pipe Flashing Kits that provides you with all the necessary parts to install your roof boot. These kits include the metal roof boot, NovaFlex metal roof sealant, metal roofing stitch screws, and a magnetic socket nutsetter for easy fastening.
How to Install a Roof Boot (Step-By-Step Guide)
Tools Required:
- Utility Knife
- Caulk Gun
- Drill
- Tape Measure
Materials Required:
- Metal Roof Boot
- NovaFlex® Clear Silicone Metal Roof Sealant
- 1/4" x 7/8" Metal Roof Pipe Boot Stitch Screws
- 5/16" Magnetic Socket Nutsetter
- Purple PVC Primer (for new pipe installs)
- PVC Cement (for new pipe installs)
#1. Install the Roof Pipe
The first step is installing the roof pipe if it hasn't been already. Make sure your piping system is situated where you want it to be inside the metal building. This helps you plan where the vent pipe will penetrate through the roof, preventing any unnecessary cuts.
Start by cutting a hole in your metal roof. The diameter should be the same size as the pipe's outer diameter (or Pipe OD). You can measure this using a tape measure. For this task, we recommend using a durable sheet metal hole cutter that stations in place while cutting a nice, clean circle through the metal sheet, as shown in the video and in the photo below:

Once completed, remove the metal to expose the wood underneath. The next part is to cut a hole into the wood the same diameter as cutting into the metal. Our video demonstration uses a hole saw with a carbide tip the same size as the pipe's diameter. You'll want to cut through the wood and through any insulation underneath.
With the hole ready, you'll want to feed your vent pipe through the roof. Make sure that the vent pipe is connected and sealed with purple primer and PVC cement, both which can be picked up at your local hardware store.
NOTE: If your roof pipe is already installed, then make sure you inspect and clean the area around the pipe before you install the roof boot.
#2. Measure and Cut the Roof Boot
After completing the vent pipe installation, then the next step is to cut the roof boot to the right measurement. Using a utility knife, cut through the rubber rib that best suits your vent pipe.
When cutting your boot, you should always cut the layer that's slightly smaller than your pipe's diameter. Doing this ensures that the boot flexes around the pipe once installed, providing a snug fit and tight seal to prevent water leakage. Discard any excess rubber cut off from the roof boot.
#3. Install the Roof Boot
Next, you'll want to prepare the roof boot for installation. The first part involves filling in any visible gaps around the vent pipe using spray foam. This adds a layer of protection against water leakage if the roof boot were to fail. Once that's done, apply Novaflex® Metal Roof Sealant to the surface of the metal roof and the bottom side of the boot. Slide the roof boot over the vent pipe and slowly push the flashing down the pipe until it makes contact with the metal roof. Put pressure on the boot's aluminum to stick the sealant together.
You can install the roof boot square with the roof, or for optimal use, rotate the boot to make a diamond (as shown below). This keeps water from building up as it diverts down the tip of the diamond and off the roof. If the roof boot was laid square, then roof sealant is required around all edges of the boot. Use any remaining Novaflex Sealant to complete this task.

After securing the boot around the pipe, the last step in installing the flashing is to fasten metal roofing stitch screws around the aluminum perimeter. These screws help to keep the boot sealed tight against the metal sheet roof and prevent it from shifting over time. When fastening, keep the screws 1-1/2" apart and tighten them just enough that the sealant starts to squeeze out of the bottom of the boot.
#4. Inspect and Seal
With the roof boot installed around the vent pipe, the next step involves inspecting the flashing for any gaps or loose areas. Run your fingers around the roof boot's edges to ensure that the sealant is applied and distributed evenly. If you notice any gaps, shore them up using additional sealant.
#5. Maintenance
Lastly, keep regular maintenance over your roof boot to address any wear, damage, or potential issues that occur over time.
Safety Tips for Installing a Roof Boot
When installing roof boots (or anything!) on metal roofs, it's always important to stay safe and take precautions to prevent any injury or damage. Here are a few tips to follow when installing roof boots up on a roof:
-
Move carefully. Always move about the roof with caution. Clear the area of your roof of any trip hazards such as branches or leaves. Never move about a metal roof when slippery due to rain, snow, or ice. If windy outside, stay low to the roof and avoid standing straight up without proper footing.
-
Know your situation. Make sure that when you cut into the metal roof that it is free of any hazards such as electrical wiring or structural beams.
-
Keep materials and tools organized. To keep things from rolling right over the edge, have your tools and supplies lay flat and out of the way when they aren't in use.
- Wear protection. Metal sheet roofing gets very hot during the day. To prevent burns on your body, try wearing pants or some form of knee/shin pads if you wear shorts. This protects your body while staying comfortable on the job.